Hands-on Aerospike with Go
This is an extremely basic introduction to Aerospike. It's basically a compilation of resources to help you quickly get started.
SQL Analogy
I think the best way to start learning Aerospike is to establish an analogy with SQL databases.
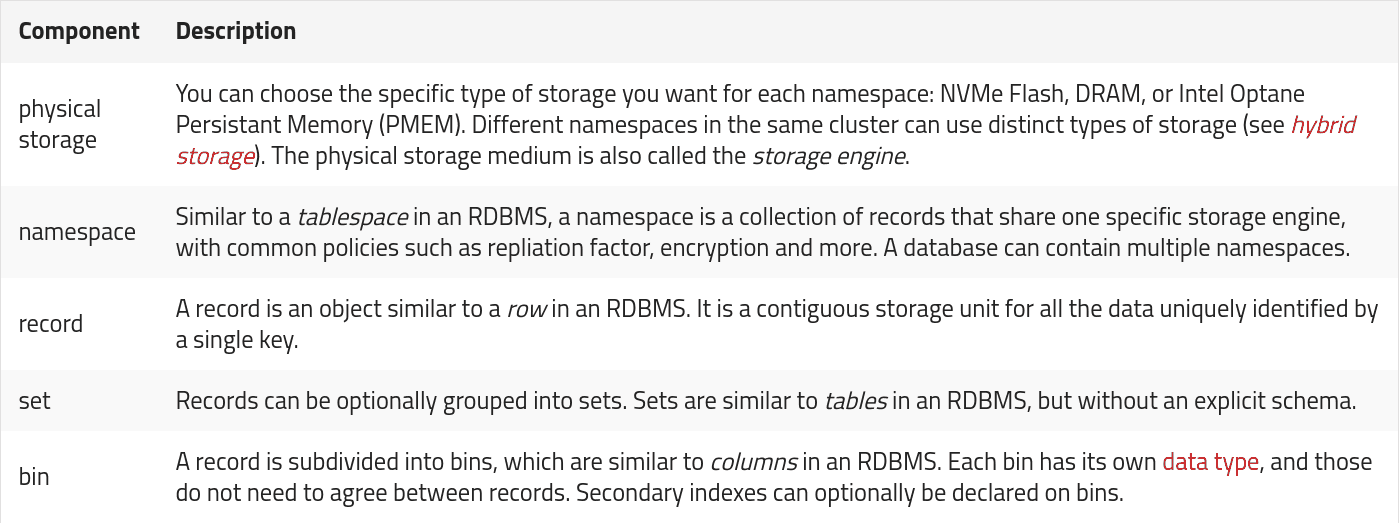 Conceptual components of Aerospike Data model
| Aerospike | SQL |
|---|---|
| NameSpace | TableSpace |
| Set | Table |
| Record/Object | Row |
| Bin | Column |
| Key | Primary Key |
Knowing this much will be sufficient to get us started.
Install Aerospike
I'd recommend installing Aerospike with Docker just because it's simple that way. For this article, I'm using version 5.5.0.2.
# Download aerospike docker image
docker image pull aerospike:5.5.0.2

# Start docker
docker container run -p 3000:3000 --rm aerospike:5.5.0.2
Aerospike server, by default, runs on port 3000. The -p flag tells Docker to map the container's port 3000 to our system's port 3000. The flag --rm will automatically delete the docker container after we stop the aerospike server.
You also need to download the Aerospike Go package which is officially available at github.com/aerospike/aerospike-client-go
go get github.com/aerospike/aerospike-client-goWith both of these installed, let's get started.
1. Connect to Aerospike from GO
package main

import (
	"log"

	as "github.com/aerospike/aerospike-client-go"
)

func main() {
	client, err := as.NewClient("localhost", 3000)
	if err != nil {
		log.Fatal(err)
	}
	client.Close()
}
These few lines of code will connect to Aerospike and then close immediately.
2. Create a Set
Naturally, the next move you'd think would be to create a Set as we do in relational databases. However, that's not required in Aerospike because our table (Set) does not have a fixed schema.
The data model is determined through your use of the system. For example, if you wanted to add a new data type to a record, you would write that data type into the record without having to first update any schema
3. Inserting data
Although we didn't need to explicitly create a Set, we do however require one. Let's call our Set "Person".
And also a namespace is mandatory. Let's name it "Avengers" for lack of a better word right now 🤷♂️. The namespace cannot be created from a client but needs to be configured in the server itself. By default, a namespace called "test" is created automatically. Let's create our namespace by modifying the docker command. We can pass in a NAMESPACE environment variable to the docker container and it'll create the namespace for us.
docker container run -e 'NAMESPACE=Avengers' --name 'Aero' -p 3000:3000 --rm aerospike:5.5.0.2I've assigned a name to the docker container so that's it'll be easier to reference it later.
Close the previous container and run the above command to restart the Aerospike server.
3.1 Storing Records
For every record that we want to store, we need a key to identify that record; just like a primary key in RDBMS. Let's use the person's name as the key 🙃.
Then we need to create the record itself. Just so we have a reference, let's try to insert the person's age and the name.
# Reference SQL table
+-----+----------+
| age | name     |
+-----+----------+
| 25  | "Aditya" |
+-----+----------+
"age" and "name" are columns (bin). We can create them like this
binAge := as.NewBin("age", 25)
binName := as.NewBin("name", "Aditya")
Finally, to piece everything together here's the code to store the record.
package main

import (
	"log"

	as "github.com/aerospike/aerospike-client-go"
)

const Namespace = "Avengers"
const Set = "Person"

func main() {
	client, err := as.NewClient("localhost", 3000)
	if err != nil {
		log.Fatal(err)
	}
	defer client.Close()

	// Create key for a record
	key, err := as.NewKey(Namespace, Set, "aditya")
	if err != nil {
		log.Fatal(err)
	}

	binAge := as.NewBin("age", 25)
	binName := as.NewBin("name", "Aditya")

	client.PutBins(nil, key, binAge, binName)
}
Notice that I never explicitly create the Set "Person". It is created automatically on-demand.
The PutBins() method can take in any number of bins. If you supply two bins with the same name, then the latter will take precedence.
3.2 Different way to create and store bins
Instead of creating each bin one by one, we can instead create a BinMap.
binMap := as.BinMap{
  "age":  25,
  "name": "Aditya",
}

client.Put(nil, key, binMap)
To me, this looks neater and I think is more readable. Then we can use the .Put() method to store the bins.
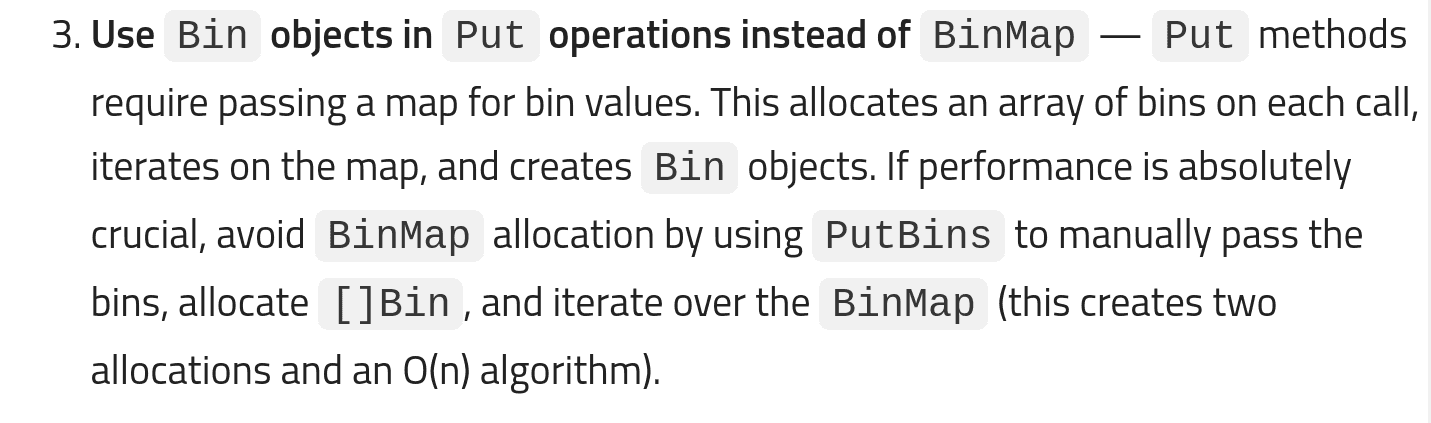
3.3 PutBins() vs Put()
So we have two methods to insert bins. Which one should you prefer? Well internally, Put() uses PutBins() and the Official Best Practices recommends using PutBins over Put to avoid allocation for binmaps.
4. Reading records
We can read the records from Aerospike using the Key.
package main

import (
	"fmt"
	"log"

	as "github.com/aerospike/aerospike-client-go"
)

const Namespace = "Avengers"
const Set = "Person"

func main() {
	client, err := as.NewClient("localhost", 3000)
	if err != nil {
		log.Fatal(err)
	}
	defer client.Close()

	// Create key for a record
	key, err := as.NewKey(Namespace, Set, "aditya")
	if err != nil {
		log.Fatal(err)
	}

	binMap := as.BinMap{
		"age":  25,
		"name": "Aditya",
	}

	client.Put(nil, key, binMap)

	// Read a record
	record, err := client.Get(nil, key)
	if err != nil {
		log.Fatal(err)
	}
	fmt.Println(record.Bins)
}

// OUTPUT
//s map[age:25 name:Aditya]
In addition to reading records with the key, Aerospike also offers a basic query language. It's similar to SQL but nowhere near as powerful. Here's an example query
SELECT * FROM Avengers.Person WHERE age BETWEEN 15 AND 30I won't be discussing Aerospike Query language (AQL) in this article.
5. Deleting records
We can delete specific records by the key or drop the entire records in the Set.
package main

import (
	"fmt"
	"log"

	as "github.com/aerospike/aerospike-client-go"
)

const Namespace = "Avengers"
const Set = "Person"

func main() {
	client, err := as.NewClient("localhost", 3000)
	if err != nil {
		log.Fatal(err)
	}
	defer client.Close()

	// Create key for a record
	key, err := as.NewKey(Namespace, Set, "aditya")
	if err != nil {
		log.Fatal(err)
	}

	binMap := as.BinMap{
		"age":  25,
		"name": "Aditya",
	}

	client.Put(nil, key, binMap)

	// Read a record
	record, err := client.Get(nil, key)
	if err != nil {
		log.Fatal(err)
	}
	fmt.Println(record.Bins)

	// Delete Record
	existed, err := client.Delete(nil, key)
	if err != nil {
		log.Fatal(err)
	}

	if existed {
		fmt.Println("Record deleted")
	}
}
Droping the entire records in the set
client.Truncate(nil, Namespace, Set, nil)6. Policy
Did you notice that the first argument when inserting and reading records was set to nil? That parameter is the policy. A Policy helps us define the behavior of read and write operation and much more. For example: what happens when we insert a record with a key that already exists? We can define a policy to overwrite the previous data or ignore the one being inserted.
Let's create a write policy that'll tell Aerospike server to replace old records if new ones arrive
policy := as.NewWritePolicy(0, 0)
policy.RecordExistsAction = as.REPLACE
7. AQL
Aerospike offers a command-line utility - AQL. It comes preinstalled in the docker image we downloaded. Let's get an interactive shell on the container
docker container exec -it Aero aqlTry out these few queries
SHOW NAMESPACES;

SELECT * FROM Avengers.Person;

TRUNCATE Avengers.Person;

SHOW BINS;
References
- Aerospike Glossary
- Aerospike Data Model
- Aerospike AQL
- Aerospike Policy
- Aerospike Go client Usage
- Video demo of amazing scalability of Aerospike
- Redis vs Aerospike use cases?
- How is aerospike different from other key-value nosql databases?
- What are the use cases where Redis is preferred to Aerospike?